The Map
Equip Yourself for Adventure
Your Navigator and Ally in Orienteering
In Orienteering, the Map isn’t just a tool—it’s the heart of the adventure. It’s designed to provide an accurate and detailed representation of the terrain, guiding participants through diverse landscapes while presenting strategic challenges. Let’s dive into the specifics of what makes an Orienteering Map truly unique.

What Sets an Orienteering Map Apart?
Scale for Precision
Orienteering maps are typically larger scale than standard maps, offering greater detail:
1:10,000 Scale: One centimeter on the map equals 100 meters on the ground. Ideal for shorter or more intricate courses.
1:15,000 Scale: One centimeter equals 150 meters. Used for longer Orienteering courses.
This level of detail ensures you can see every nuance of the terrain, from tiny paths to subtle elevation changes.
Topographical Contours
Contour lines represent the shape and elevation of the land.
Closely spaced lines indicate steep slopes, while wider spacing signals gentle terrain. Key contour features like hills, depressions, and ridges are highlighted to help you visualize the 3D landscape in your mind.
Color Coding
Orienteering maps use internationally recognized colors for clarity:
White: Forested areas that are runnable.
Green: Dense vegetation or obstacles; the darker the green, the harder it is to pass through.
Yellow: Open areas like fields or meadows.
Blue: Water features such as lakes, rivers, and marshes.
Black: Man-made features like roads, trails, fences, and buildings.
Brown: Contour lines and elevation features.
Map Symbols
Standardized symbols are used to mark specific features. These symbols are consistent across Orienteering maps globally, so they’re easy to understand for Participants anywhere. North is always indicated in the Map.
Accuracy and Freshness
Orienteering Maps are meticulously updated to reflect the current state of the terrain. Changes in vegetation, new paths, or constructions are captured to ensure reliability.
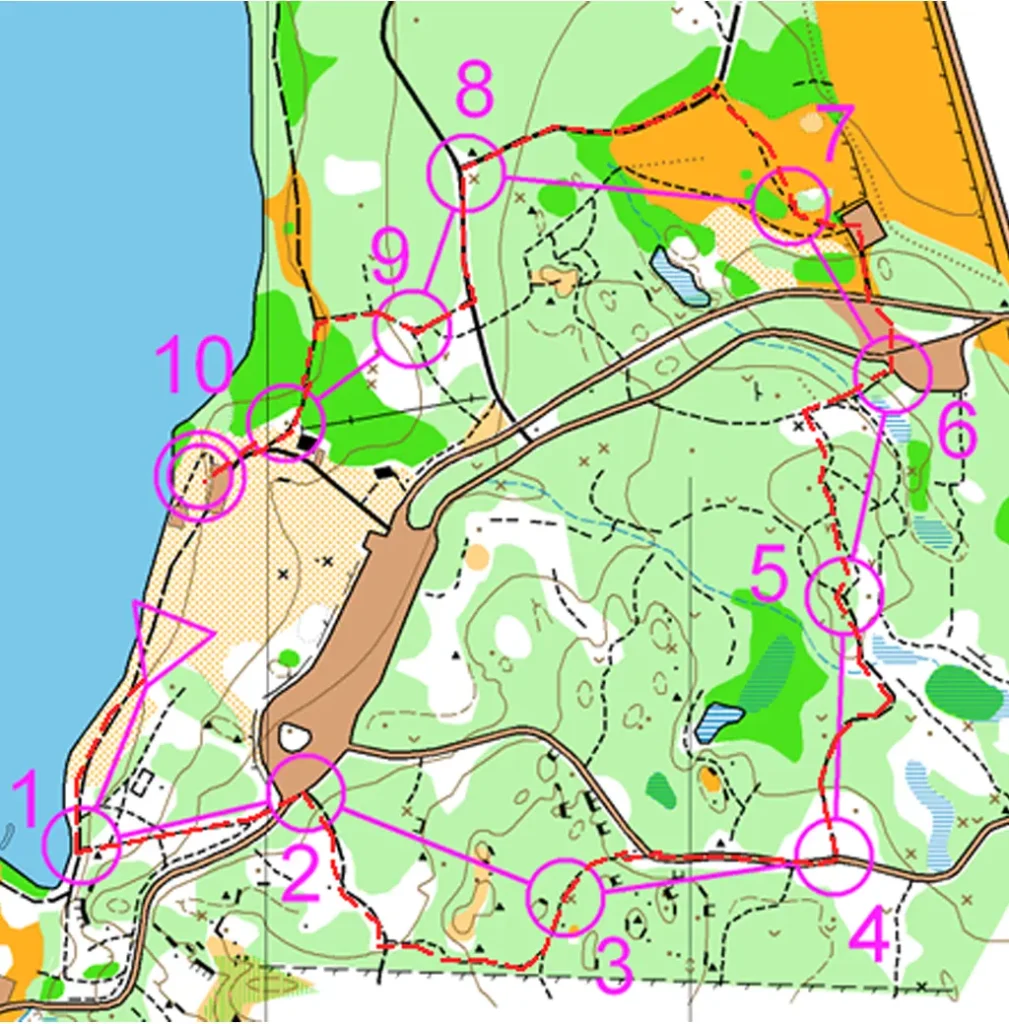
In an Orienteering Map, the start point, all the Control Points (which have to be visited and presence marked by each participant) and Finish point are marked on the Map.
A Triangle shows the start point, a Circle shows each control, a Double Circle shows the finish point.
Since the Circle, Double Circle or Triangle are relatively quite large, the Participant has to visualize the exact location of the Control on the ground as in the exact center of the Circle, Double Circle or Triangle.
On the Map, mostly lines are used to join the Start, Control, Finish Points. A lines joins the Triangle (start point) to the first circle (first control) and then to the second circle (second control) onwards upto the Double Circle (Finish point) on the Map provided to the Participants. However, the Participant can decide on the basis of the Map, the terrain and his/her navigation skill, what path to take to the next control. The Triangle, Circles and Double Circle and the Lines joining them are mostly made in Purple color.
As the direction is very important for navigation, North is always shown on each Map with an Arrow. North to South lines or grid are also provided on Map.
The Control Description Chart, having 8 columns and having specific Orienteering Symbols, is very useful in determining the precise location on the ground. This Control Description Chart can be on a separate sheet (independent of the Map) and in such case, it is put in the Control Description Sheet Holder, which is worn on the left forearm. However, for convenience, the Control Description Sheet is often printed on the same sheet as the Map (on one side of the sheet).
The Scoring Sheet or Punch Card is used to make the marks at each control by the Punch provided there (each Punch makes a separate distinctive mark). This Mark can be on a separate sheet but for convenience it is often printed on the same sheet as the Map (at the bottom of the Sheet).
The Orineteering Federation of India normally has the Map, the Control Description Chart and the Scoring Sheet, all on a single sheet for convience of the Participants.
How to Read an Orienteering Map
Orienting the Map
Use your compass to align the map with the terrain. Ensure the north on the map matches the magnetic north in the real world.
Analyzing the Terrain
Study the contour lines to understand the lay of the land. Look for key features like ridges, valleys, or water bodies to guide your route.
Choosing the Route
Orienteering maps encourage route choice. Decide whether to take a longer, easier path or a shorter, more challenging route.
Consider obstacles, elevation changes, and your stamina.
Using the Legend
Always refer to the map legend to decode unfamiliar symbols.
The legend provides details specific to the map’s region and course.
Tips for Mastering Orienteering Maps
- Practice Reading Maps Regularly: Familiarity with map features improves your speed and confidence.
- Visualize the Terrain: Try to imagine the landscape based on the map before moving.
- Plan Ahead: Always look a few checkpoints ahead to maintain momentum.
- Adapt as You Go: The terrain may present unexpected challenges—stay flexible.